
|
Thank you, from the Foods of the World Forums! |
Everything Bagel Kit from FarmSteady |
Post Reply 
|
| Author | ||
TasunkaWitko 
Admin Group 

Joined: 25 January 2010 Location: Chinook, MT Status: Offline Points: 9389 |
 Post Options Post Options
") Thanks(0) Thanks(0)
 Quote Reply Quote Reply
 Topic: Everything Bagel Kit from FarmSteady Topic: Everything Bagel Kit from FarmSteadyPosted: 08 November 2016 at 15:16 |
|
|
Everything Bagel Kit from FarmSteady
This thread will chronicle the “bagel half” of the Everything Bagel and Cream Cheese kit that I recently purchased from FarmSteady: http://farmsteady.com/ This handy kit comes with everything that you need to make delicious, home-made cream cheese as well as wonderful Everything Bagels. The kit is “reusable” in the sense that you learn some valuable techniques and skills in order to make these foods again any time, using a bagel recipe and the cheesecloth provided; you will have some rennet left over, as well, that can be used again. Click here for details and discussion regarding this and other kits from FarmSteady: http://foodsoftheworld.activeboards.net/pretzel-bagel-cheesemaking-kits-from-farmsteady_topic4698.html Click here for my pictorial and discussion regarding the home-made Cream Cheese: http://foodsoftheworld.activeboards.net/cream-cheese-kit-from-farmsteady_topic4708.html I’m a pretty big fan of these kits and the folks that produce them. They have provided valuable information along with the necessary materials, ingredients and inspiration, making these worth much more than the sum of their parts. I’ve learned a lot about cheesemaking as well as the steps in making bagels (and - soon - pretzels); further, the success that I’ve had thanks to these kits inspires me to continue learning, outside of these introductory experiences. If it weren’t for these kits, I’d still be wanting to make things such as this, instead of actually making them. According to Alison Herman and Maria Balinska, bagels and their development are “inextricably tied with that of the Jewish-American experience.” A brief history of bagels follows:
Balinska herself delves even deeper into history of the bagel, as exhibited in this article from Slate.com by Joan Nathan:
If you really want to learn all there is to know about bagels, you can purchase Maria Balinska’s book, The Bagel: The Surprising History of a Modest Bread: http://www.amazon.com/Bagel-Cultural-History-Maria-Balinska/dp/0300112297/ref=sr_1_1?ie=UTF8&s=books&qid=1226086666&sr=1-1 (Note - Please take a moment and click on the link above in order to learn more about this book from Amazon. By doing so, you help this site pay for itself!) As you can see, much has been written, both in fact and in legend, about the bagel and it is undeniable that bagels are a mainstay of modern American culture. To me, bagels bring up images of sunny mornings at a busy diner in New York City; it is simply the connotation that comes to mind - and a natural one, considering the immigrant history of our country’s most prominent metropolis. But the truth is that you can enjoy a bagel anywhere and anytime, whether it is morning in Manhattan, or evening in Montana! I made these bagels late one recent October night and had a great time. Two of my sons and my father were on hand, so we all worked together on them. I took some photographs of the process, but I will warn you ahead of time that my phone alternates - for no reason that I can find - between absolutely wonderful photos and downright terrible photos. Nevertheless, I have included some of the not-so-good photo for the purpose of demonstrating some parts of this process. My apologies accompany the lesser-quality photos. Here is everything that comes in the kit for the bagel side of the project: 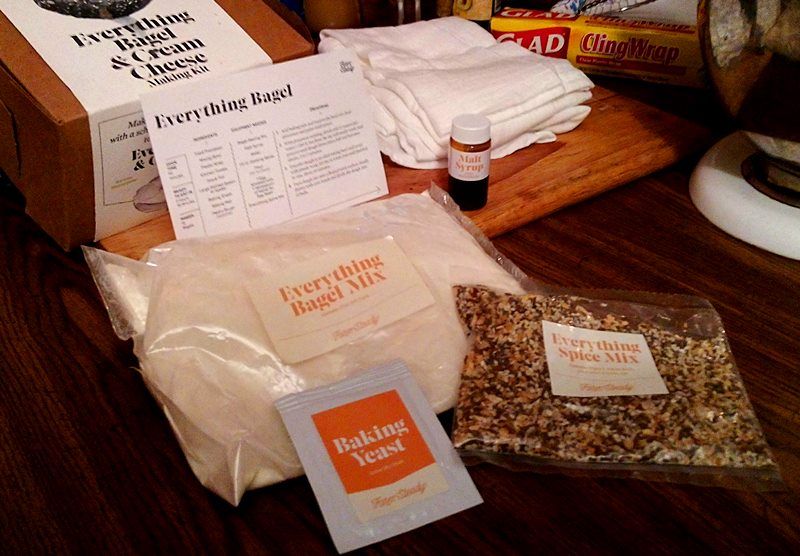 Clockwise from the top: malt syrup, “Everything Spice Mix,” yeast and “Everything Bagel Mix.” More about some of these products later, but as you can see, they are pre-packaged for convenience. Any and all can be procured through other means for future bagel-baking sessions. Note the instruction card that explains in detail how to make bagels. The information there can be used in the future, as well. The instructions for making the bagels can also be found at FarmSteady’s website: https://farmsteady.com/instructions-how-to-make-everything-bagels/ There are some slight differences, but the differences are not worth worrying about. The online instructions also include a very helpful video that goes a long way to illustrate a few key steps in the process: https://youtu.be/3aemIAEqsqU Once again, I feel that the education and experience gained was worth at least as much as - if not more than - the ingredients (and resulting bagels) themselves. It was convenient having everything in one kit, but the real value, to me, is that purchasing the kit motivated me to finally stop planning on it and start doing it. Here are some additional ingredients that you will need in order to make the bagels: Water Oil or nonstick spray Flour (for dusting surfaces) 1 egg Here is a list of additional equipment that you will want to have available: Food processor or stand mixer Mixing bowl Plastic wrap Kitchen Towels Large slotted spoon or spider Baking sheet Baking mat (I’m not sure how necessary this one is, but I had one, so I used it) Pastry brush Once you have everything ready, you can begin your bagel-making adventure! The instructions say to begin the bagels by adding the baking mix and yeast to a food processor, then pulse it until the components are thoroughly mixed. After that, run the food processor whilst drizzling 12 ounces of hot water into the flour and yeast. Keep it running for about two or three minutes, until the dough forms into an elastic ball. My food processor is not big enough to do this, so I used my Kitchen Aid stand mixer: 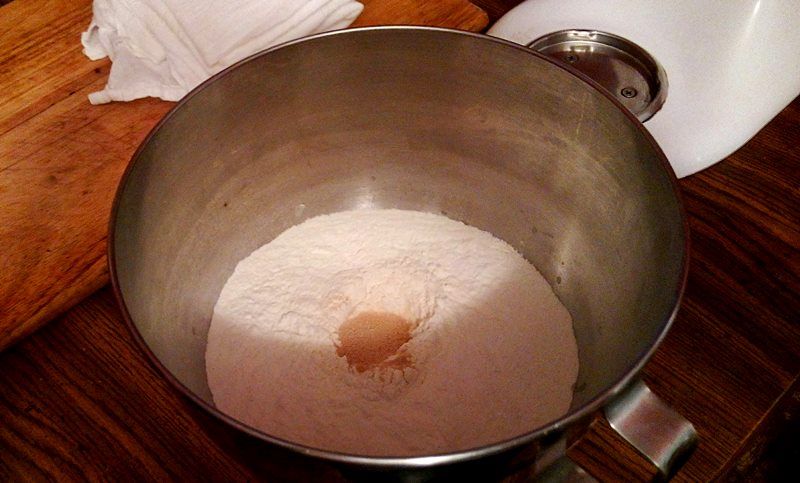 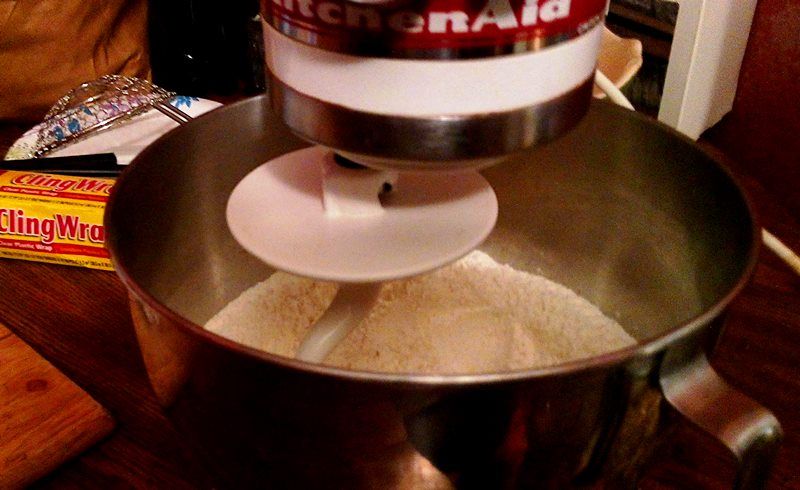 I let the dough hook work the dough for about 10 minutes, which seemed about right. I did have to add a little bit of flour to the mix in order to get the non-sticky, elastic feel to the dough, but it wasn’t much; surely no more than a third of a cup, and probably a lot less than that. From this point, I proceeded with the written instructions, moving the dough to an oiled bowl: 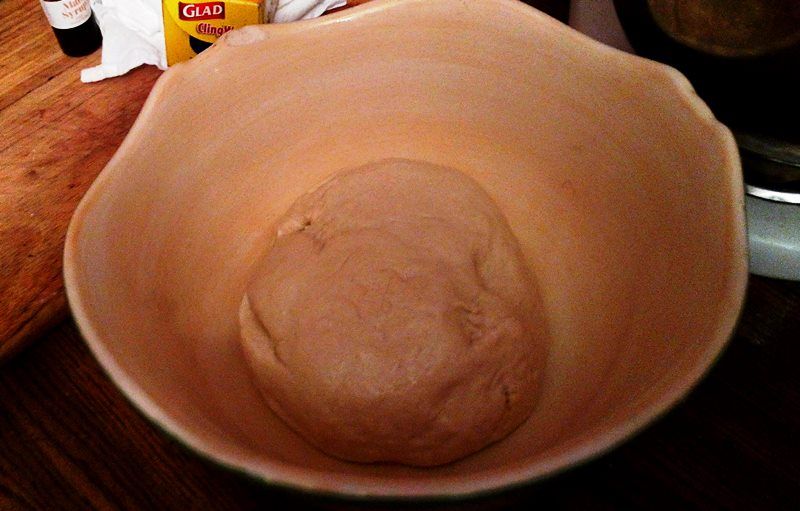 After that, I covered the bowl with plastic wrap and put it in the oven (power was off, but the light was on) so that the dough could rest and rise until it doubled in size. The instructions say that this should take about 45 minutes, but it is a rather cool time of year up here; I let the dough rise for just about an hour, and called it good. After that, I lightly floured up my cutting board, punched the dough down a bit, and then divided the dough into 12 balls, as evenly as I could: 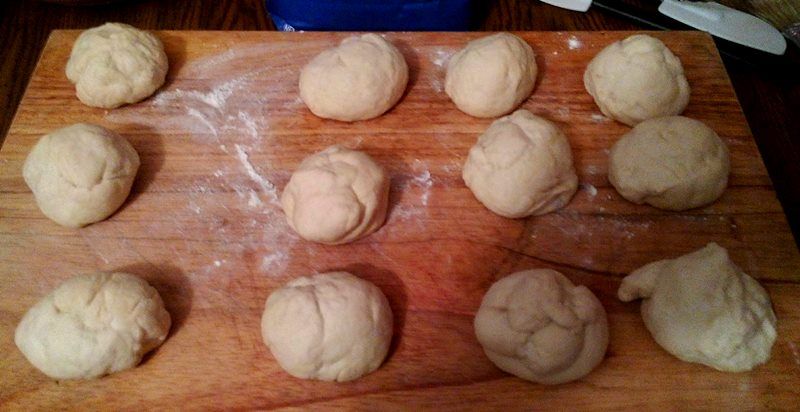 Now comes the part where we actually turned the dough into bagels! Once this was done, my youngest son and I rolled and pulled each dough ball into a rope, about 1 inch in diameter and 6 or 8 inches long. Once we had the rope, we would hold one end in the hand while wrapping the other end around the back of the hand, bringing it around to where we began and making a loop. We then twisted and pressed the ends of the loop together to seal and form a ring of dough. We then repeated this until we had formed all 12 bagels: 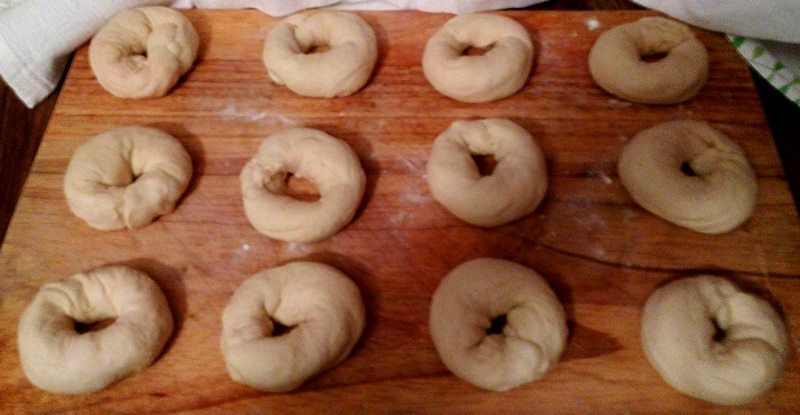 This step is illustrated very well on the instructional video in the link above, but it is also a very natural and intuitive process; after the first or second try, you will not have any problems duplicating the procedure. As you can see in the picture above, some formed better than others, as we became familiar with the concept. I could have fixed the “not-so-good” ones, but elected to leave them as they were, in order to commemorate the time when my son and I learned to make bagels together. Once the bagels were formed, we carefully covered them with a clean kitchen towel so that they could rest while we turned our attention to the next step. First, fill a pot of water with 5 quarts of water and get it started on its way to a boil; a stock pot works very well for this, but any pot that will hold that amount of water will do. While you’re at it, you should also begin preheating your oven to 400 degrees. When the water reaches a boil, add the malt syrup; you want to be stirring the water as you add it, and afterwards as well, until you are sure it is completely dissolved into the water. The reason for this is that it is heavier than water, and can sink to the bottom of the pot, where it might burn or scorch. The malt syrup is crucial for achieving the distinctive flavour and texture of the bagels; in order to make bagels again in the future, malt syrup (or powder, which works just as well) can be purchased online or perhaps in grocery stores of larger towns and cities. If for some reason you cannot find it anywhere, then you can substitute with honey or brown sugar. Now, we reach one of the defining steps of bagel-making. Using a large slotted spoon, spider, wide spatula or other similar utensil, add a bagel to the boiling water. It will sink down, then float back to the top in a moment. When it floats up, start counting out 30 seconds; at 30 seconds, flip the bagel over and allow it to swim around for another 30 seconds before removing it from the boiling water and placing it on the kitchen towel. 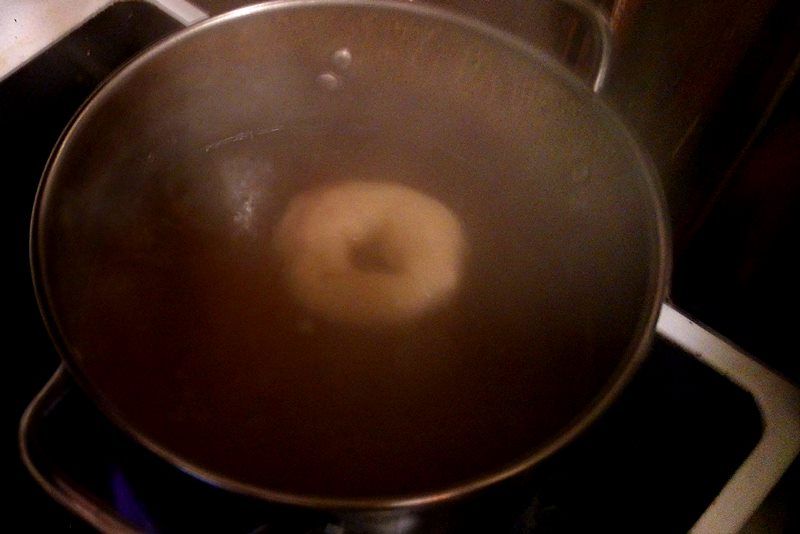 Repeat this step until all of your bagels have been “boiled” - here’s how mine looked: 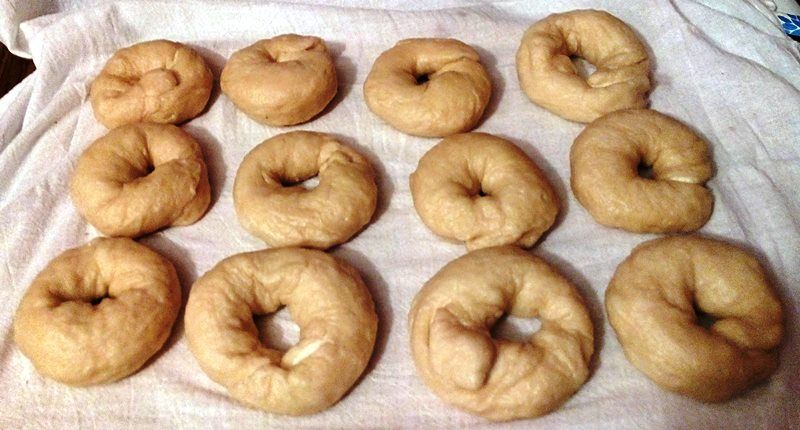 The primary purpose for this is to give your bagels the firm, chewy surface that they are famous for; it is definitely a step that you don’t want to skip! Once you gain more experience with this, you could probably do two or more bagels at a time, in order to save a few minutes; but it really doesn’t take too long, either way. Once all of your bagels have gone for their swim, transfer them to a baking sheet lined with a baking mat: 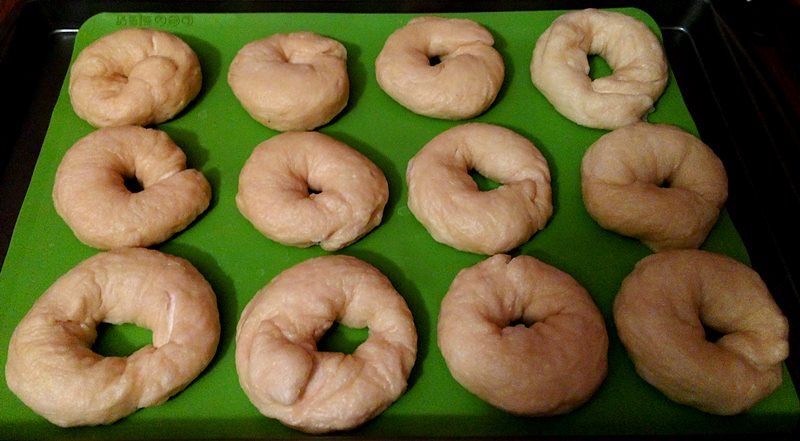 As I said earlier I am not sure how necessary the baking mat actually is, but since I had one, I used one. I am certain that parchment paper would work just as well, and wouldn’t be surprised if you could just put them on the baking sheet with nothing underneath. Next, you want to crack an egg into a small bowl or cup, add a tablespoon of water (milk might work just as well, or possibly better) and mix them up with a fork so that you can brush your egg wash onto the bagels: 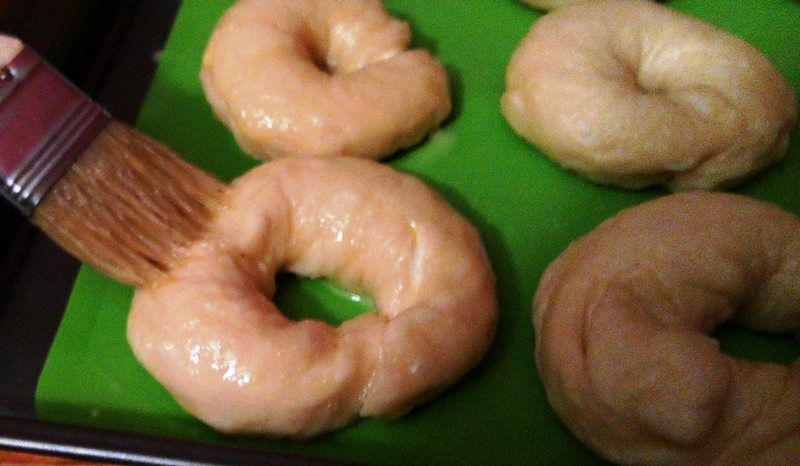 Then, sprinkle each bagel with a tablespoon (maybe a little more) of the Everything Spice Mix: 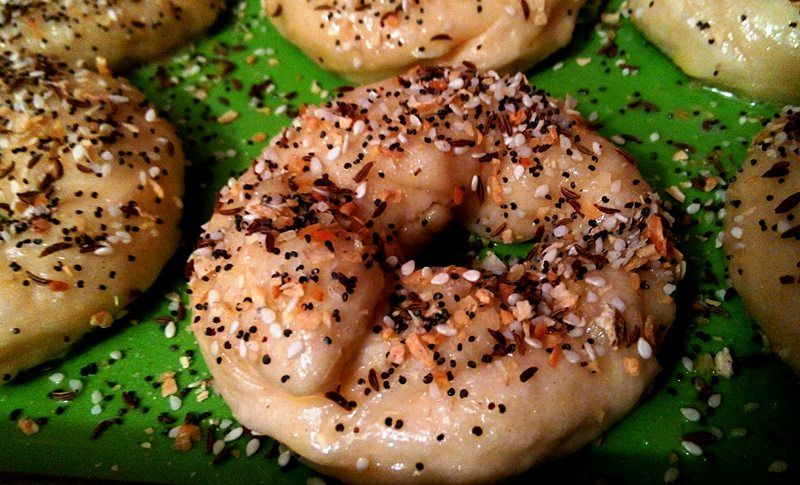 The Everything Spice Mix consists of a combination of poppy seeds, sesame seeds, onion flakes and garlic flakes; I do not know the proportions of each component in the mix, but I am sure that it would be easy to duplicate for future bagel-making sessions. You could also, of course, top the bagels with any of these components on their own; or, you could just top with a little kosher salt, or something else...or you can leave them plain, if you prefer. Here we are, ready for the oven! 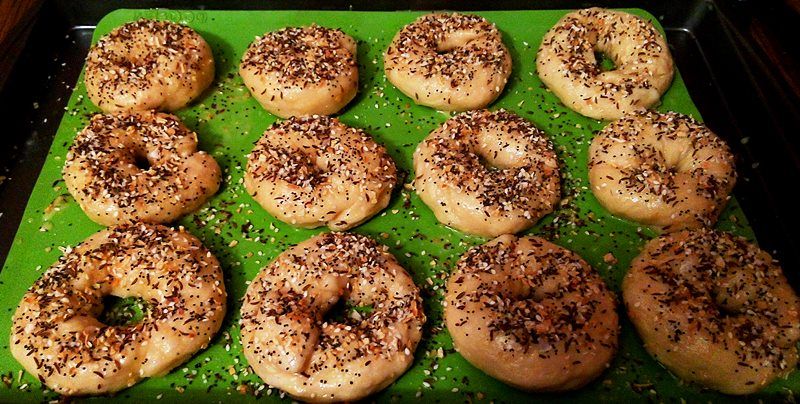 You did preheat your oven to 400 degrees, right? Bake the bagels at 400 degrees for a total of 25 to 30 minutes; after about 10 minutes, I flipped the baking sheet around for even baking. The written instruction card that came with the kit added an extra step here, advising one to flip the bagels over, upside-down - after 20 minutes of baking, leaving them that way for the last 5 or 10 minutes of baking. I assume that this is so that the bottoms can crisp up a bit; I tried it, and liked the result, but I am not sure that it is necessary. Here we are, fresh out of the oven: 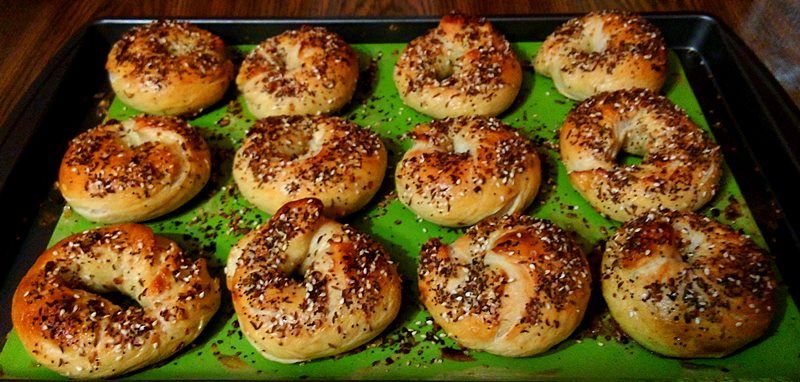 I really liked what I was seeing, and smelling! It’s possible that I could have baked them just a couple-three minutes longer; but then again, maybe not. They had that shiny, shell-like exterior when I tapped them, and the colour was, in my opinion, wonderful to behold. I don’t mind saying that I was pretty proud of myself and what I had done, and I feel it necessary to repeat that I probably would not have yet tried this project if I wouldn’t have purchased this kit, so I am sure glad that I did. I could have done it without the kit, but chances are that I wouldn’t have. The "motivation factor" really kicked in, once I actually had everything there together.  My helpers - Dad and two of my sons - and I didn’t even really give the bagels time to cool down a bit; once they were finished, we each enjoyed one fresh out of the oven, with a healthy schmear of my delicious home-made cream cheese. If you look closely, you can see it melting on the hot bagel here: 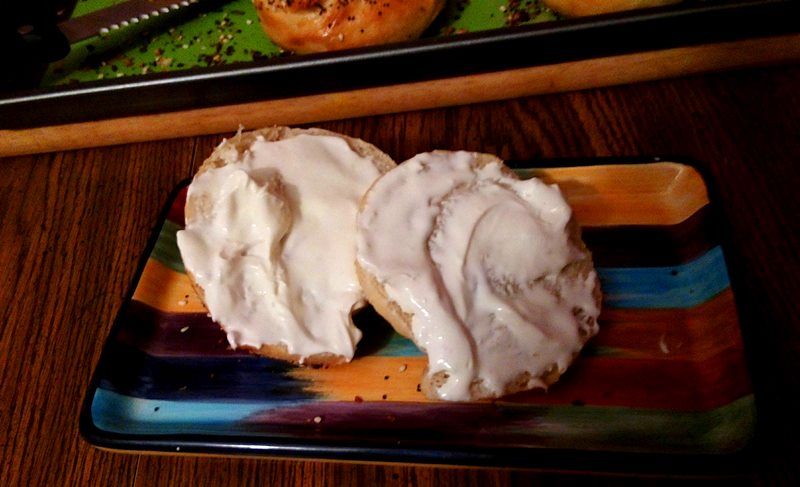 How did they taste? Well, pretty much perfect. Everything - and I do mean everything - that I love about bagels could be found in a single bite, except that the experience was so much more than any I had ever had before.The outside had the crunch and the and the baked, “browned” flavour that I crave; the inside was tender, chewy and filled with just the right goodness that I was expecting. The wonderful aroma, tangy cream cheese, and enticing Everything Spice Mix added to the experience, transporting me right to a booth in the aforementioned downtown Manhattan diner described above. The rest were carefully stowed away, to be eaten for breakfast the next morning. The whole family really enjoyed them, and look forward to the next batch. Now that I’ve actually made bagels, I can’t imagine buying them in the store ever again, so they will be made at least a few times each year. I hope that you’ve enjoyed reading this pictorial as much as I have enjoyed writing it; even more, I hope that it inspires you to try your own hand at making bagels; it’s easy, and as you can see, it has its own rewards. If you do try them, let us know about it! Post your experience here; and, as always if you have any questions, comments or feedback, please feel free to post those as well. If I don’t know the answer, I’ll find it! Thanks again for taking time out of your day to read this, and take care - Ron |
||
|
If you are a visitor and like what you see, please click here and join the discussions in our community!
|
||
 |
||
| Sponsored Links | ||
|
||
|
TasunkaWitko
Admin Group
Joined: 25 January 2010 Location: Chinook, MT Status: Offline Points: 9389 |
Post Options
Thanks(0)
Quote Reply
Posted: 28 February 2017 at 16:07 |
|
|
Note - when making these again and adding malt syrup to the water for the boiling stage, FarmSteady recommends using 3 to 4 Tablespoons of a pale malt extract. This is for liquid malt extract (aka LME); I am not sure what the amount would be for dry malt extract (DME).
|
||
|
If you are a visitor and like what you see, please click here and join the discussions in our community!
|
||
|
||
|
pitrow
Master Chef

Joined: 22 November 2010 Location: Newberg, Oregon Status: Offline Points: 1087 |
Post Options
Thanks(0)
Quote Reply
Posted: 01 March 2017 at 09:04 |
|
|
Ron, it's funny you should bring that up. Just yesterday I found this "easy" chart for converting between LME, DME and Grains. I assume based on some of the other pages I looked at that this is based on sugar content, so it might not line up perfectly with baking needs, but would probably get you in the ball park.
https://www.jaysbrewing.com/2011/11/17/lazy-chart-for-converting-dme-lme-grain/ |
||
|
Mike
Life in PitRow - My often neglected, somewhat eccentric, occasionally outstanding blog |
||
|
||
|
HistoricFoodie
Admin Group
Joined: 21 February 2012 Location: Kentucky Status: Offline Points: 4945 |
Post Options
Thanks(0)
Quote Reply
Posted: 01 March 2017 at 11:26 |
|
|
In his formula for bagels, Peter Reinhard says 2 tablespoons dry to 3 tablespoons wet barley.
I don't know what "pale" malt is. In bread baking, non-diastatic malt barley is the go-to type, because of its enzyme content, which is lacking in the diastatic type. |
||
|
But we hae meat and we can eat
And sae the Lord be thanket |
||
|
||
|
TasunkaWitko
Admin Group
Joined: 25 January 2010 Location: Chinook, MT Status: Offline Points: 9389 |
Post Options
Thanks(0)
Quote Reply
Posted: 25 August 2017 at 09:41 |
|
|
Brook - "pale malt" simply means that it is malt from very lightly-kilned barley. In brewing, pale malt (either in extract or grain form) is probably the most widely-used base malt for beer, as it is like a blank canvas that one can add other characteristics to in order to produce many various beers.
I am sure that it is indeed diastatic, due to the fact that it is fermentable. On the other hand, FarmSteady/Brooklyn Brew Shop did recommend its use. I am guessing this is to "simplify" the process that you've mentioned. I can say with condifence that it works, because the bagels were great - but they might not be "pure" where authenticity is concerned. I went a slightly different route and bought some "Bavarian wheat" liquid mallet extract, partially so I can try it with this, and partially so I can try a few brews with it, as I have never brewed with extracts before - sort of killing two birds with one stone. I will give this a shot, and report on results as compared with my first efforts. I need to get moving on this, as a friend/co-worker brought a special ingredient to me to try: evidently, you can actually buy New York City water in bottles, and she got me a few liters of it. We should soon be able to see if the legend is true, that NYC is the best water to use. 
|
||
|
If you are a visitor and like what you see, please click here and join the discussions in our community!
|
||
|
||
|
Post Reply
|
|
 Tweet
Tweet
|
| Forum Jump | Forum Permissions You cannot post new topics in this forum You cannot reply to topics in this forum You cannot delete your posts in this forum You cannot edit your posts in this forum You cannot create polls in this forum You cannot vote in polls in this forum |


 Topic Options
 Beginning in eastern Europe as the product of Jewish bakers, the bagel was a luxury item in the 17th century. As wheat became cheaper, the bagel became a widely consumed - and widely beloved - snack food…. [Bagels] had even become part of eastern European...rhymes for children…. There are stories told about bagels [and] songs about bagels.”