Photographing & Posting Pictures of Your Food
Printed From: Foods of the World Forum
Category: Welcome to the Foods of the World Forum
Forum Name: New Members' Lounge, Announcements and Site Assistance
Forum Discription: Drop in here to introduce yourself, get the latest news about the site, and ask questions about using this forum!
URL: http://foodsoftheworld.ActiveBoards.net/forum_posts.asp?TID=68
Printed Date: 26 March 2026 at 16:21
Topic: Photographing & Posting Pictures of Your Food
Posted By: Guests
Subject: Photographing & Posting Pictures of Your Food
Date Posted: 31 January 2010 at 10:26
Posting your pictures is very easy and free. Although there are several image hosting services out there, I use "photobucket" because it is simple and it is FREE  Go to http://www.photobucket.com%20" rel="nofollow - http://www.photobucket.com and sign up for a free account. http://www.howtogeek.com/forum/topic/tutorial-step-by-step-guide-how-to-use-photobucket" rel="nofollow - click here for a great tutorial on how easy it is to upload pictures to photobucket:
http://www.howtogeek.com/forum/topic/tutorial-step-by-step-guide-how-to-use-photobucket" rel="nofollow - http://www.howtogeek.com/forum/topic/tutorial-step-by-step-guide-how-to-use-photobucket
Simply size your pictures to 800 pixels wide, then upload them at http://www.photobucket.com/" rel="nofollow - www.photobucket.com . When they are finished uploading, hit the button marked "VIEW ALBUM" or "SAVE AND CONTINUE TO MY ALBUM." To post it on your thread in the Foods Of The World, you must copy the IMG code and paste it on your thread. You just place your cursor over the IMG CODE line, LEFT CLICK and you will see a note saying COPIED. Then you just place your cursor on the place on your FOTW post, and paste - here's a visual:
you will see all of the pictures you just uploaded. hover the cursor over the one you want (or the first one in the "series" if you are doing multiple pix) and you will see a dropdown appear that looks like this:
 click ONCE on the IMG CODE option (circled in red above) and it will copy the tag for you, then simply paste that into your post.
for multiple pictures, you can repeat the procedure, or simply paste the same tag as before, then change the last part of the tag to reflect the "name" of the next picture; i number the pictures for each project to make this very easy, all i have to do is change the number at the end. The correct format will look like this (brackets are substituted by "{" signs, and dots are replaced by the word, "DOT"): {img}addressDOTcomDOTpicture_name_numberDOTjpg{/img}
That's all there is to it!
[22 AUGUST 2012]
ALTERNATE PROCEDURE for posting photos in FOTW, once they are on photobucket: after some "messing around" on photobucket, i think I may have found an easier way to post photos that might be helpful for those who are having trouble. if you fall into this category, take a look at this:
once your photos are on photobucket, open a new window or tab to create or edit your FOTW post. then simply click on the little thumbnail of the photo to open the photo in its own page, then copy it. to do this, RIGHT CLICK (or the android equivalent) on the photo and choose COPY. then go back to the post that you are creating or editing in FOTW, and PASTE the photo wherever you want it.
repeat as necessary.
try that and see if it works. this, to me, seems the easiest way possible. between this method and the methods outlined earlier in this thread, it should be easy.
there's also the photo button up above where you write the post (the little picture that looks like this:
 ). you can click on that and input the address of the photo. PLEASE NOTE that there is an option to upload photos to the FOTW server, and you can do this, but space might be limited. ). you can click on that and input the address of the photo. PLEASE NOTE that there is an option to upload photos to the FOTW server, and you can do this, but space might be limited.any questions, just ask ~
ron |
Replies:
Posted By: TasunkaWitko
Date Posted: 02 September 2010 at 07:21
|
hey, guys -
a friend on facebook makes homemade candy was talking about her frustrations when trying to photograph her finished product. i got to thinking it would make a good topic here.
what are some of the things you all do to get the best pictures possible? background? setting? angles? light? presentation? what else? ------------- If you are a visitor and like what you see, please http://foodsoftheworld.activeboards.net/registration_rules.asp?FID=0" rel="nofollow - click here and join the discussions in our community! |
Posted By: Guests
Date Posted: 04 September 2010 at 15:17
|
You got to get the subject of the pic to fill the frame. GET CLOSE. For instance, if you are taking a pic of a bowl of beans, then get as close as possble to the bowl of beans. Make those beans fill the frame. You don't want the spoon, the napkin nor the wall calendar or the mail, neither. If you are wanting to show something to your observer, then make their eyes see what you want them to.
Sometimes, a background is appropriate and the immediate surrounding helps make the picture. In this case, back off just enough to take these details in, but no more. Again, keep the viewer focused.
Don't be afraid to play with light. Point lamps in different angles, look through the lense and pay attention to what you see. Some of the best pictures come from terrible lighting that just harmonizes and shows off the dish! Not all pics have to be well lit, straight on. The shadows created by the lamp also emphasized the browning of the skewers from the broiler.
Nobody likes an eye-ache nor a head-ache, so please don't post fuzzy pics; they give you both. I made a mistake and posted this one because I wanted to demonstrate what I was writing about. I forgot that good writing beats a picture 100% of the time. It is better to skip a bad shot and describe it than to subject your viewers to a poor image.
So, skip the cellphone shots, the shaky shots and write about it instead. Nothing worse that scrolling down and being assaulted by a jarring image.
Get DOWN WITH YOUR FOOD! I mean get down with it! Squat! Sit! Lean forward until your back hurts. Rest your wrists on the counter, just get that lense at the food level. THAT makes for a great shot....it brings the viewer right to where the food is, at its level and brings that baby home. Getting down also gives you the power to create impressions. Don't overlook this technique to give your subject power.
Sometimes you have to get UP in the sky so to speak . Stand on a chair and get that special shot staright down. I have a special chair I use for just these shots....it's an old kindergarden wooden chair, the kind from 50 years ago, and it serves perfectly.
These are the basics.
There are so many bad images around, please try not to add to the mix
Anyways, hope this helps and keeps the pictures coming! ------------- |
Posted By: Hoser
Date Posted: 05 September 2010 at 03:55
|
Here's a look at what a little time and a great deal of talent can produce presentation-wise. From the cheftalk forum 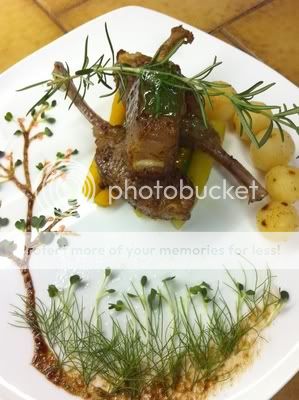 ------------- Go ahead...play with your food! |
Posted By: got14u
Date Posted: 07 September 2010 at 07:57
|
Now that is pretty cool hoser. I do not have the patience for that at all. Plus I am usually in to much of a rush to get the food on the table for the kids...lol. There is definitely a art to getting a good shot of food ------------- Jerod Life's hard, it's even harder when your stupid. |
Posted By: DIYASUB
Date Posted: 14 September 2010 at 11:20
|
Perhaps I can add to this thread by mentioning that I have discovered that the food pics I import here from my photobucket account must be resized to fit properly.
It's no real trouble to do this.
I copy the direct link URL from my photobucket account, then come back here and click on the picture icon. It opens a page where I can paste the URL, which I do.
Before I hit the submit button, I do the resizing.
In my particular case the pics I've imported have a height and width represented by the numbers 800 and 600. I've learned to reduce those numbers by half simply by backspacing them out and replacing them with 400x300. This allows the reader to view the post and pics without having to slide the page back and forth.
I hope this can be of some help to anyone that may have run into the same problem.
|
Posted By: Melissa Mead
Date Posted: 28 December 2011 at 18:19
|
Ok, I feel foolish. I tried to make a post about what I did with the goose fat, with pictures, but I could only post one picture. When I posted a second, it replaced the first. Any idea why? ------------- Melissa http://carpelibris.wordpress.com/ - http://carpelibris.wordpress.com/ |
Posted By: TasunkaWitko
Date Posted: 28 December 2011 at 18:33
|
melissa, no need to feel foolish - it takes a little getting used to! the "post picture" buttons in the software work here, i never use them. generally, the easiest way i've found to post pix is this: (note that in the examples below, the "{" characters will substitue for [brackets]): you want to have the URL (web address) of the picture inside image ({IMG}) "tags." to get the address of a picture already on the internet, right-click on the picture and then highlight and copy the address. you will need to do this for each picture you post. then, inside your post, you can post the picture by setting up your image tags: {img}{/img} and then pasting the address of the picture between the brackets - example: {img}address . picture . com . jpg{/img} note: if you use photobucket, it's even easier. there will be a list of codes below your picture in your album. the one for posting here is on the bottom, and is automatically copied when you click on it. the procedure above sounds complicated, but it's really very easy and, once you get the hang of it, quite fast. try that, and if you have anymore troubles, let me know! ------------- If you are a visitor and like what you see, please http://foodsoftheworld.activeboards.net/registration_rules.asp?FID=0" rel="nofollow - click here and join the discussions in our community! |
Posted By: Hoser
Date Posted: 29 December 2011 at 02:11
|
Photobucket is also the method I use and it's very easy and reliable. Here is a good basic tutorial on http://www.howtogeek.com/forum/topic/tutorial-step-by-step-guide-how-to-use-photobucket - photobucket that should help you out Melissa ------------- Go ahead...play with your food! |
Posted By: TasunkaWitko
Date Posted: 29 December 2011 at 08:56
|
outstanding, dave - since the original one in the first post here is out of date (photobucket has gone through some changes since then), i'll replace portions of it with this link. ------------- If you are a visitor and like what you see, please http://foodsoftheworld.activeboards.net/registration_rules.asp?FID=0" rel="nofollow - click here and join the discussions in our community! |
Posted By: Margi Cintrano
Date Posted: 22 March 2012 at 08:51
|
4.45pm
Ron,
Signed on to Photo Bucket ... even uploaded a few photos ( assorted ), all except GAZPACHO !
It seems it is in my email, from You Ron, However, the photo is ? on my Pendrive ...
PLEEZE KEEP CALM MARGI ... ( I am as Techi as a peanut, however, that is what http://www.lastminute.com - www.lastminute.com said in the UK and today, she is a millionaire with one of the 1st Travel Agencies online ! )
I am going to try and get it on the pendrive for starters, then the 2nd thing is to go back to upload it on PHOTO BUCKET
If I have any other probs with Gazpacho, I shall send u another email
Grazie ...
Margi.
------------- Volamos a Mediterraneo, un paraiso que conquista su gente u su cocina. |
Posted By: TasunkaWitko
Date Posted: 22 March 2012 at 08:58
|
hi, margi - i am thinking that you should be able to save the photo onto your desktop (or the smart-phone equivalent of a desktop or folder) and then upload to photobucket from there? i do not have a smart-phone (in fact, my phone is very, very dumb - lol), so i do not know for sure. i am not familiar with pendrive, but if i am reding your description right, it should work just fine. once it is on photobucket, it should be very easy to post, but if you have problems, just let me know! ------------- If you are a visitor and like what you see, please http://foodsoftheworld.activeboards.net/registration_rules.asp?FID=0" rel="nofollow - click here and join the discussions in our community! |
Posted By: Margi Cintrano
Date Posted: 22 March 2012 at 10:54
|
19.00 Hrs. Thursday Ron ( and Marissa, )
Firstly Ron, Yes, I do an Android Samsung Galaxy Mobile phone with internet access.
@Marissa: I got through Step A today which is a breeze, that is to get your photos on your Photo Bucket Account ... HOWEVER, Step B is a bit complex at the moment ... I am as techi as a peanut, so do not feel so bad. We both shall pass the test eventually !
Margaux. ------------- Volamos a Mediterraneo, un paraiso que conquista su gente u su cocina. |
Posted By: TasunkaWitko
Date Posted: 22 March 2012 at 11:13
|
using the guidelines above, here's my recommended "method" to do pix, from start to finish, for a "pictorial" or guide:
STEP 1 - FORMAT AND UPLOAD THE PICTURE TO PHOTOBUCKET
a) take the picture (of course!)
b) if necessary, convert the picture from whatever format (TIF, PNG, BMP etc.) to JPEG or JPG.
c) crop and/or adjust picture attributes (brightness, saturation etc) as necessary
d) re-size picture to 800 pixels wide
e) re-name the photo and save it as a JPG. what i normally do is name them in chronological/procedural order, starting at 1 and going up to whatever number i need to in order to complete the "series."
example: gazpacho1, gazpacho2 etc
this way, the URL will be exactly the same for each picture in the series, except for the number corresponding to the number of pictures in the series
example: gazpacho1 through gazpacho5 f) upload all the pix in the series together to photobucket
g) from photobucket, copy/paste the IMG tags into your post at FotW -
STEP 2 - USING PICTURES FROM PHOTOBUCKET IN YOUR POSTS OR PICTORIALS
1) COPY the IMG tag for the first picture and then paste (CTRL+V) the IMG tag into the post as many times as necessary in the series. note that the IMG tag will be identical for each picture throughout the entire web address/URL/IMG tag, except for the NUMBER of the picture in the series.
example: if there are 5 pictures in the series, paste (CTRL+V) the complete IMG tag for the first picture (gazpacho1) 5 times, with a space between each pasting:
CTRL+V
ENTER
CTRL+V
ENTER
etc.
this will give you 5 lines of the complete "IMG tag," ending with "gazpacho1.jpg" and the "/IMG tag," each separated by a space
2) when you have pasted it in as many times as necessary, simply go back and alter the NUMBER ONLY (remember, everything else is the same) to correspond with the picture in the series.
example: instead of five lines of gazpacho1, alter the numbers ONLY to read the IMG tag/URL/address followed by:
gazpacho1.jpg (ending with /IMG tag)
(space)
gazpacho2.jpg (ending with /IMG tag)
(space) gazpacho3.jpg (ending with /IMG tag)
etc. 3) go back to the beginning of your post and add the text, explanations, etc. to correspond with each picture.
example: your post might read something like this:
"here are the ingredients necessary to make gazpacho"
(space)
(IMG tag for gazpacho1)
(space)
add any notes about the ingredients, or perhaps point out that the ingredients are easy to find, etc.
(space)
the first step in making gazpacho is to (describe the procedure)
(space)
(IMG tag for gazpacho2)
(space)
and so on and so forth....
repeat down the line, adding headers and (if desired or necessary) footers to each picture until you are done with your post.
for other examples, see many of the posts here that outline procedures for making various dish or recipes.
i hope this is clear, but if anyone has any questions or needs clarification, please let me know.
ron ------------- If you are a visitor and like what you see, please http://foodsoftheworld.activeboards.net/registration_rules.asp?FID=0" rel="nofollow - click here and join the discussions in our community! |
Posted By: Margi Cintrano
Date Posted: 22 March 2012 at 11:18
|
Ron,
It sounds a hell of alot simpler than Photo Bucket, Google or any other Computer Instructions for uploading, downloading or any other acitivity I have encountered. I think you are a pretty good coach ... Thanks for all your clarification. Let me see, how I can use over wkend and then, I shall have my viewpoint ! I now understand TAG PART = NAME OF PHOTO & NUMBER OF PHOTO IN SERIES.
Thanks for clarifying.
Kindly.
Margi. ------------- Volamos a Mediterraneo, un paraiso que conquista su gente u su cocina. |
Posted By: TasunkaWitko
Date Posted: 22 March 2012 at 11:20
|
margi - i made a couple of edits to my psot above, which should help clarify what i mean. take a look and let me know.
once a person is accustomed to this method, it is very easy and very fast ~ let me know if you have questions. ------------- If you are a visitor and like what you see, please http://foodsoftheworld.activeboards.net/registration_rules.asp?FID=0" rel="nofollow - click here and join the discussions in our community! |
Posted By: Margi Cintrano
Date Posted: 22 March 2012 at 12:00
|
Ron,
I am going to try it out on Saturday morning ... It is always my free morning ... This way, I can see, how I match each step, with each step in Photo Bucket ... and on the Community Website ... it seems clear, however, when you are learning something brand new, there is a tendency to feel overwhelmed ... I understand STEP A ---
Now in practice, I need to do STEP B, to answer you and advise where I might have the probs.
DISHES AND INGREDIENTS: Yes, it is important especially for those living in rural zones, to have availability SEASONALLY to many of the foreign ingredients is quite difficult --- and one should list substitutes or Possibilities where to buy on line in USA or in state next to the state they live --- it is important to assist and give advice ...
Kindest.
Thanks.
Margi. ------------- Volamos a Mediterraneo, un paraiso que conquista su gente u su cocina. |
Posted By: TasunkaWitko
Date Posted: 12 April 2012 at 15:20
|
the main thing i can think of is:
tell a story with your pictures, whethr it is one picture or a sequence of them. try to show the colours to advantage, and the action, when you have the opportunity.
for some possible ideas on getting better photographs, take a look at a lot of my "signature posts" or "pictorials." some of my ideas there might be of help. some favourites that immediately come to mind (i will add to this list as appropriate) are:
http://foodsoftheworld.activeboards.net/forum_posts.asp?TID=333&title=irish-soda-bread" rel="nofollow - Irish Soda Bread
http://foodsoftheworld.activeboards.net/forum_posts.asp?TID=1582&title=carne-de-res-kalimotxo" rel="nofollow - Carne de Res Kalimotxo
http://foodsoftheworld.activeboards.net/forum_posts.asp?TID=1355&title=sopa-de-ajo" rel="nofollow - Sopa de Ajo
http://foodsoftheworld.activeboards.net/forum_posts.asp?TID=842&title=paella-de-los-montaas" rel="nofollow - Paella de los Montañas
http://foodsoftheworld.activeboards.net/forum_posts.asp?TID=576&title=paella-the-national-dish-of-spain" rel="nofollow - Paella ~ The National Dish of Spain
http://foodsoftheworld.activeboards.net/forum_posts.asp?TID=666&title=estofado-de-carne-de-toro" rel="nofollow - Estofado De Carne De Toro
http://foodsoftheworld.activeboards.net/forum_posts.asp?TID=888&title=potage-parmentier-and-vichyssoise" rel="nofollow - Potage Parmentier and Vichyssoise
http://foodsoftheworld.activeboards.net/forum_posts.asp?TID=1477&title=erwtensoep" rel="nofollow - Erwtensoep
http://foodsoftheworld.activeboards.net/forum_posts.asp?TID=1805&title=geschmorter-schweinsbraten-mit-kapern" rel="nofollow - Geschmorter Schweinsbraten mit Kapern http://foodsoftheworld.activeboards.net/forum_posts.asp?TID=846&title=shrimp-scampi-scampi-alla-griglia" rel="nofollow - Shrimp Scampi (Scampi alla Griglia)
http://foodsoftheworld.activeboards.net/forum_posts.asp?TID=1219&title=cotolette-di-maiale-alla-milanese" rel="nofollow - cotolette di maiale alla milanese
http://foodsoftheworld.activeboards.net/forum_posts.asp?TID=1254&title=gnocchi-e-polpette-con-salsa-di-pomodoro" rel="nofollow - Gnocchi e Polpette con Salsa di Pomodoro
http://foodsoftheworld.activeboards.net/forum_posts.asp?TID=806&title=manzo-brasato-alla-lombarda" rel="nofollow - Manzo Brasato alla Lombarda
http://foodsoftheworld.activeboards.net/forum_posts.asp?TID=1589&KW=&title=psit-choirin-filto" rel="nofollow - Psitó choirinó filéto
http://foodsoftheworld.activeboards.net/forum_posts.asp?TID=1001&title=paprika-hendl-german-hungarian-or-romanian" rel="nofollow - paprika hendl - german, hungarian or romanian?
http://foodsoftheworld.activeboards.net/forum_posts.asp?TID=1468&PID=9984&title=draculas-2011-paprika-hendl-dinner-party#9984" rel="nofollow - My entry from the 2011 Dracula's Paprika Hendl Dinner Party
http://foodsoftheworld.activeboards.net/forum_posts.asp?TID=1789&title=bogrcs-gulys" rel="nofollow - Bogrács Gulyás
http://foodsoftheworld.activeboards.net/forum_posts.asp?TID=1946&title=potatoandcheesefilled-pierogies" rel="nofollow - Potato-and-Cheese-Filled Pierogies
http://foodsoftheworld.activeboards.net/forum_posts.asp?TID=1253&title=babiky-haluky-s-kapusta-alebo-tvarohom" rel="nofollow - Babičky Halušky s Kapusta alebo Tvarohom
http://foodsoftheworld.activeboards.net/forum_posts.asp?TID=917&title=project-pastram" rel="nofollow - Project Pastramă
http://foodsoftheworld.activeboards.net/forum_posts.asp?TID=1603&title=dried-beef-aka-chipped-beef-from-venison" rel="nofollow - "dried beef" (aka "chipped beef") from venison
http://foodsoftheworld.activeboards.net/forum_posts.asp?TID=887&title=frsruladers" rel="nofollow - Färsrullader
http://foodsoftheworld.activeboards.net/forum_posts.asp?TID=171&KW=&title=sima-traditional-lemon-mead-from-finland" rel="nofollow - Sima (Traditional Lemon Mead from Finland)
http://foodsoftheworld.activeboards.net/forum_posts.asp?TID=980&KW=&title=chex-party-mix" rel="nofollow - chex party mix
http:%20%20href=" rel="nofollow - Pineapple Upside-Down Cake
http://foodsoftheworld.activeboards.net/forum_posts.asp?TID=1593&KW=&title=meatloaf" rel="nofollow - Meatloaf
http://foodsoftheworld.activeboards.net/forum_posts.asp?TID=1247&title=the-butte-pasty" rel="nofollow - The Butte Pasty
http://foodsoftheworld.activeboards.net/forum_posts.asp?TID=682&title=sandwiches-cubanos" rel="nofollow - Sandwiches Cubanos
http://foodsoftheworld.activeboards.net/forum_posts.asp?TID=226&title=anticuchos" rel="nofollow - anticuchos
http://foodsoftheworld.activeboards.net/forum_posts.asp?TID=768&title=gyuniku-teriyaki" rel="nofollow - gyuniku teriyaki
http://foodsoftheworld.activeboards.net/forum_posts.asp?TID=1779&title=making-maddies-pork-chops" rel="nofollow - Making Maddie's Pork Chops not all of these are 100% perfect, but these are my favourites ~ there are elements in each one that have some really good ideas hopefully illustrating some of the ideas we are talking about on this thread. any other ideas are very much welcome. on the other side of the coin, some pictures there (hopefully they will be clear) are an example of what NOT to do!
if anyone else ends up with a pictorial that they are really liking, feel free to post a link here as a reply ~ ------------- If you are a visitor and like what you see, please http://foodsoftheworld.activeboards.net/registration_rules.asp?FID=0" rel="nofollow - click here and join the discussions in our community! |
Posted By: Rod Franklin
Date Posted: 12 April 2012 at 16:06
|
Excellent examples. Setting up the stuff in the frame seems like something I have a grip on. Maybe you can help with some other questions. I'm pretty sure to get a quality photo I'm going to have to set the camera to manual. I also think I'm going to have to create a set. I need to know stuff like lighting differences and setups. By that I mean types of lights and their set up around the shot. Diffusers and reflectors and shadows and stuff. Like F stops and shutter speeds and how these work. These are the things that confuse me. I don't have lots of cash or a fancy digital camera, but it is digital, and I can fake the rest. I would rather just point and shoot, but that's not working out as you might have noticed in the few pictures I've placed in here. ------------- Hungry |
Posted By: TasunkaWitko
Date Posted: 12 April 2012 at 16:26
|
rod ~ i gotta be honest, buddy: i just set my 65$ panasonic to automatic! here are some things i do that seem to help get better-looking photos, but as far as the camera goes, i don't do much.
most digital cameras have a button that you can push that looks like a little flower - this is for more close-up photos (within 5 metres, i think, but i could be wrong). i use this whenever i can.
i also try to use the flash whenever i can, unless it washes out the photo. using the flash can help with a sharper image, and also lets them "pop" a little. if your flash is adjustable (stronger or lighter intensity of flash), so much the better, so that you can adjust that as needed to minimise wash-out.
for most of those "pictorials" up there, i am guessing there were probably 10 "discarded" or "rejected" pictures for each one that i found usable. thank the lucky stars for digital cameras, where this is concerned.
those are really the only camera-related things i do - for me, the real work begins after the shot.
once i have the pictures, and choose the ones i want to keep, i re-name them according to the project and sequence (example: paella 1, paella 2 etc.), and then tweak them just a bit. any basic photo-editor will be fine, such as photoshop or microsoft photo editor - for a lot of things, even simple MS paint will be a big help.
a) i ROTATE the photograph, a degree at a time, until whatever i want to show is aligned the way i want it to. usually only 1-5 degrees are necessary.
b) after that, i CROP the photograph, cutting away wall space, table space, my kid in the background sticking his tongue out, the cats trying to paw at the meat on the table, filthy stovetop, and everyhting else. basically, i cut out EVERYTHING i don't want to show, focusing on whatever subject is at hand at the moment.
NOTE: this is not to say that you should eliminate a background - where appropriate, backgrounds are wonderful, especially in table settings or in some preparation pictures. a bottle of wine, an opened container of an ingredient being measured, etc. are all good things, but you want to draw attention to what's going on, too, and cropping really helps trim the fat on the photo.
c) next, i hit the "auto adjust" or "auto fix" or "auto enhance" button - almost any program has this function, but if not, it isn't necessary. the thing i like about mine is that it tends to really make colurs "pop," almost as if they are in the old-style kodachrome. many of the links above show this very well.
d) next, i resize the photo to 800 pixels wide, save and close.
e) next, for some reason, the pictures i do can be reduced in "disk space size" (NOT in screen or pixel size) by opening them again in MS PAINT (only this program), and then simply saving and closing. this will cut the "disk space"" size of the picture nearly in half, every time, with no reduction in quality. this is a factor when uploading to photobucket or wopening the web page, so it is worth trying with your computer to see if you get the same result. if you do, it's a short step that is worth the time. if not, no worries.
finally, after all of that, i load it up to photobucket, get the IMG code and get to work building the post, as described here:
http://foodsoftheworld.activeboards.net/forum_posts.asp?TID=68&PID=11961&title=how-to-post-pix-and-create-a-pictorial#11961 - http://foodsoftheworld.activeboards.net/forum_posts.asp?TID=68&PID=11961&title=how-to-post-pix-and-create-a-pictorial#11961
do a little experimenting and see how you do! ------------- If you are a visitor and like what you see, please http://foodsoftheworld.activeboards.net/registration_rules.asp?FID=0" rel="nofollow - click here and join the discussions in our community! |
Posted By: Rod Franklin
Date Posted: 12 April 2012 at 16:32
|
That's the kind of nuts-n-bolts information I need to read! Thanks for that.
------------- Hungry |
Posted By: HistoricFoodie
Date Posted: 12 April 2012 at 17:08
|
Rod, here's the quickest way to learn the effect of light and elevation changes.
Get you four eggs, and build a pyramid of them on a plain surface. Now get a high-intensity desk lamp, one with an adjustible arm.
Using no other light, set the hi-intensity lamp so it's barely higher than the top egg. Sit it at 3 oclock. Take a picture. Now start moving the lamp, keeping it the same distance from the pyramid, all the way to 9 o'clock in 5 minute increments.
Once that's done, adjust the height of the light by 4-6 inches, and repeat all the shots you took the first time around. If you've still got height adjustment, do it again.
Now examine all those pix. You'll immediately develop a feel for how light and shadow interplay to create texture, shape, and movement.
|
Posted By: ChrisFlanders
Date Posted: 13 April 2012 at 05:15
|
I pretty much do the same as Ron does. Most of my pictures posted here are taken with an outdated 5 megapixel 10-year old Canon Powershot. I have a much more sophisticated recent camera but I prefer the Canon because it has a rotating screen which I like for taking food pictures, but that isn't even significant for taking good pictures. Remember, it's not the camera that takes pictures, it's the person behind it! I give myself maximum... 10 seconds to take a plated food picture, preferably 5 seconds! No set-ups, no fuss. It's not because I have found a hobby in photographing food that others should be served cold food. Set the camera like Ron says to macro* (the little flower, sort of tulip-like symbol used on most digital cameras). If you have lighting under your upper kitchen cabinets, turn them on, even in bright day-light. I hold the back of the camera against the bottom of the upper kitchen cabinet and click, there's no more to it. Don't worry about framing, this is digital photography; do the framing afterward. What I don't do like Ron, is using the flash. Never when taking pictures from that close. To be honest, I avoid using the flash on my cameras in any other circomstances, it's no more than personal preference. You can set your camera to use or to not use the flash*, according to your liking. The consequences are that you need to stabilize your camera while taking pictures without flash in darker circomstances, something I have to do almost always. Ignore the red warning "wobbling" sign on your camera screen, simply hold your camera against the upper kitchen cabinets. No tripod, no extra lamps, no assistants, no make-up artists, just put on as much lighting as available in your kitchen, 10 seconds max. and click. Of course, you are going to need to adjust your pictures on your computer, that's where all the fun is in digital photography. On to the computer work. This is the most time-consuming for me but it's something I really like to do. Use any photo-editor program to adjust lighting, to frame, to crop etc. as Ron says in his post above. Any good editing program -free or not- will have a number of tools that are relevant*; you can adjust so much "error" in digital pictures. Most digital cameras come with included software* to tweak your pictures! I use the quite extended Photoshop to work on my pictures. It has a feature that will frame and cut (crop) my preferred ideal internet format of 800 x 600 pixel picture (in "landscape" format) out of my photos (or 600 x 800 in a "portrait" format) in one go. There's a lot to be said about saving your picture for the internet which Ron pointed out under "e)" as "reducing disk space size". Internet pictures mostly have only 72 pixels per inch sizes or better said, resolution. The more sophisticated your camera, the higher this resolution is. What basically happens when reducing disk space size, is that your pictures are recalculated to this 72 ppi size and will not only upload faster to Photobucket but also into the page your picture has to be shown in. (*) Camera settings and photo-editing software; if nothing else works, RTFM (=read the fxxxxxxg manual!!) |
Posted By: Rod Franklin
Date Posted: 13 April 2012 at 08:02
|
So, you both take maximum resolution photos then use Photoshop (which I don't have) or do the save and close trick with MS Paint? I always take the lowest resolution photos as is possible with my camera. Maybe that has been part of my problem. Lighting "temperature": I've got a mix of fluorescent lighting in my kitchen which seems to always lead to variable amounts of blueness in my photos. Even though I set the camera to compensate for fluorescent lights I still get these blue effects to some degree and it really changes the color of the food, and not always in a pleasant way. Maybe I'm doing it wrong. I go RTFM. I will take all this kindly offered advice and see what I can do to improve my pictures. Thanks kindly to all. ------------- Hungry |
Posted By: TasunkaWitko
Date Posted: 13 April 2012 at 09:05
|
rod - i always take the highest resolution possible, and then work down from there on the computer. as chris says, in this day and age, its where the work (and the joy) is.
if you don't have photoshop, no worry. your computer SHOULD ahve a default photo editing program called microsoft photo editor (or maybe microsoft picture manager), which is the one i use. you also have a huge selection of free downloads on the internet, almost any of them would work just fine. as i said above, a good "sequence of events" would be to first rotate (if necessary), then crop (almost but not always necessary), then use the "auto fix" or "auto enhance" (which should be a one-click deal), then re-seize (SCREEN SIZE, not disk-space size) down to 800 wide (600 wide for portriat-style or "tall" pictures), then finally save and close. the MS PAINT step is done AFTER all this, and for some reason the open/save/close step reduces the DISK-SPACE size, at least on my computer.
chris, you make a good point about this:
>>>If you have lighting under your upper kitchen cabinets, turn them on, even in bright day-light.<<<
a lot of times, the flash wouldn't be my first choice, but it's almost always the choice i have. for some reasn, my camera doesn't seem to do well, even in good sun and artificial light, but i still get the most of both that i can, even if i have to use the flash. ------------- If you are a visitor and like what you see, please http://foodsoftheworld.activeboards.net/registration_rules.asp?FID=0" rel="nofollow - click here and join the discussions in our community! |
Posted By: ChrisFlanders
Date Posted: 13 April 2012 at 10:12
|
Rod, when you take pictures in a higher resolution (not all digital cameras can!!), the image will always be better to work with. After that, reduce or crop to a size of 800 px width (c.q. height) as Ron already explained and save the image under another name. This way you will always keep the original to work with again. I never use the light adjustments or compensations on the camera itself, the result is so unreliable and uncontrolable on the camera screen. Better to install a good photo-editor and go from there. Or as Ron suggests to use the one that Microsoft provides, but there are however free and much better alternatives than Microsoft's software, Ron. I always have problems with too much red or yellow in many pictures, typical when taken with artificial light from different kitchen lamps. This is so stunningly easy to compensate with software, using the "(tone) curves" featured in these programs. RTFM, but mainly a lot of try-outs are required, but it's very rewarding and such fun to see how pictures can be changed or simply improved... dramatically! Which photo-editor to get if you want a good one? PhotoshopCS is quite expensive but... there are great free ones if you (hopefully) should get ambitious about photo-editing. Here they are;
FREE PHOTO-EDITORS to be downloaded from the worldwideweb GIMP free software for photo editing is known as very, very good, as in really good, going to professional. I haven't work with it, but I read here and there that it is very extended and seems to be comparable to Photoshop!! The interface however is known to be somewhat complicated, but hey, keep practicing. Photoshop took me months to learn, well, an hour now an afternoon then, you know how it goes! When you prefer somewhat easier software to work with, PhotoFiltre seems to be the most liked. Another great photo-editor is Pixia. You can download them from; Gimp; http://www.gimp.org/ - http://www.gimp.org/ PhotoFiltre; http://photofiltre.en.softonic.com/ - http://photofiltre.en.softonic.com/ Pixia; http://pixia.en.softonic.com/ - http://pixia.en.softonic.com/ |
Posted By: TasunkaWitko
Date Posted: 13 April 2012 at 10:23
|
>>>there are however free and much better alternatives than Microsoft's software<<<
very true ~ i might be looking into some of the ones you've posted. i've used gimp and really liked it, but it was on my old computer and therefore a little slow. i might try it again.
i myself am most satisfied with my pictures when i am able to give them that "kodachrome" look, where the colours really seem to pop out - it seems perfectly suited for food, but that's a personal preference.
------------- If you are a visitor and like what you see, please http://foodsoftheworld.activeboards.net/registration_rules.asp?FID=0" rel="nofollow - click here and join the discussions in our community! |
Posted By: ChrisFlanders
Date Posted: 20 April 2012 at 08:33
|
And do look out for those Photoshoppers and their little tricks!
|

Posted By: TasunkaWitko
Date Posted: 20 April 2012 at 08:54
lol - chris, when i realized what you had done, i nearly sprayed my morning coffee all overthe computer screen!  ------------- If you are a visitor and like what you see, please http://foodsoftheworld.activeboards.net/registration_rules.asp?FID=0" rel="nofollow - click here and join the discussions in our community! |
Posted By: Hoser
Date Posted: 20 April 2012 at 15:09
|
I'm thinking we now have a new LOGO!!! LOL Nice work Chris! ------------- Go ahead...play with your food! |
Posted By: Rod Franklin
Date Posted: 20 April 2012 at 15:27
|
I got the Gimp installed. I don't think I'll live long enough to learn how to use it! It's complicated, or I'm dumb, or both...
------------- Hungry |
Posted By: pitrow
Date Posted: 20 April 2012 at 16:19
| I find gimp very hard to use, bordering on impossible. Maybe it's just because I'm used to using photoshop or illustrator or fireworks or whatever, but at least those all seem to be laid out in similar fashion and things function similarly. With Gimp things seem to be done in the most unintuitive way possible. It's sorta like trying to switch to a Mac after using a PC all your life. |
Posted By: ChrisFlanders
Date Posted: 21 April 2012 at 06:18
To the new Gimp-users; ...told you!
|
 TasunkaWitko wrote:
Posted By: AK1
Date Posted: 30 April 2012 at 21:24
| Is there any way to upload photo's directly? This whole Photobucket, IMG tags is a real PITA. |
Posted By: Margi Cintrano
Date Posted: 01 May 2012 at 04:44
|
Ak1.
Personally I do agree with you, in reference that there should be a direct method, to place photos on the Forum, verses dealing with Photo Bucket ...
For me, the 1st step is a breeze and very very easy; however, the 2nd step is laborious and tedious. I have to work on this, however, as I have lovely fotos for my glossaries, and have to overcome the dilemma.
Kind regards.
Margi. ------------- Volamos a Mediterraneo, un paraiso que conquista su gente u su cocina. |
Posted By: TasunkaWitko
Date Posted: 01 May 2012 at 14:31
|
guys, i assure you, it is easy as pie, guaranteed.
Simply size your pictures to 800 pixels wide, then upload them at http://www.photobucket.com/" rel="nofollow - www.photobucket.com . When they are finished uploading, hit the button marked "VIEW ALBUM" or "SAVE AND CONTINUE TO MY ALBUM."
To post it on your thread in the Foods Of The World, you must copy the IMG code and paste it on your thread. You just place your cursor over the IMG CODE line, LEFT CLICK and you will see a note saying COPIED. Then you just place your cursor on the place on your FOTW post, and paste - here's a visual:
you will see all of the pictures you just uploaded. hover the cursor over the one you want (or the first one in the "series" if you are doing multiple pix) and you will see a dropdown appear that looks like this: give it a shot, it's easy ~ ------------- If you are a visitor and like what you see, please http://foodsoftheworld.activeboards.net/registration_rules.asp?FID=0" rel="nofollow - click here and join the discussions in our community! |
Posted By: AK1
Date Posted: 01 May 2012 at 15:16
| Yep! figured it out. Thanks. |
Posted By: TasunkaWitko
Date Posted: 22 August 2012 at 10:45
|
ALTERNATE PROCEDURE for posting photos in FOTW, once they are on photobucket: after some "messing around" on photobucket, i think I may have found an easier way to post photos that might be helpful for those who are having trouble. if you fall into this category, take a look at this:
once your photos are on photobucket, open a new window or tab to create or edit your FOTW post. then simply click on the little thumbnail of the photo to open the photo in its own page, then copy it. to do this, RIGHT CLICK (or the android equivalent) on the photo and choose COPY. then go back to the post that you are creating or editing in FOTW, and PASTE the photo wherever you want it.
repeat as necessary.
try that and see if it works. this, to me, seems the easiest way possible. between this method and the methods outlined earlier in this thread, it should be easy.
there's also the photo button up above where you write the post (the little picture that looks like this:
). you can click on that and input the address of the photo. PLEASE NOTE that there is an option to upload photos to the FOTW server, and you can do this, but space might be limited.i will add this information to the original post on this thread for easy access. hope everyone is able to find a way that works for them, and is able to post some photos now! ron ------------- If you are a visitor and like what you see, please http://foodsoftheworld.activeboards.net/registration_rules.asp?FID=0" rel="nofollow - click here and join the discussions in our community! |
Posted By: TasunkaWitko
Date Posted: 24 August 2012 at 10:02
|
CROPPING AND/OR REDUCING A PHOTO ALREADY IN PHOTOBUCKET it looks like it is pretty easy - i tried it and had no trouble at all. what you do is:
1) select that photo by hovering over the thumbnail with the cursor (go to step 2) OR click on the thumbnail to open the picture, then hover the cursor over the picture (go to step 2). 2) some choices will pop up - choose EDIT (go to step 3) 3) a screen will open up with choices along the bottom (adjustment, effect, overlay etc.). choose ADJUSTMENT (go to step 4). 4) the two buttons that you will use the most will appear right above the "adjsutment" button - they are CROP and RESIZE. 4a) to crop, simply choose that button and adjust the edges where you want them, then choose APPLY (to the right) (go to step 5). 4b) to re-size, click on the box next to WIDTH and input your desired width in pixels. (800 works best, in my opinion). The HEIGHT will automatically adjsut itself. Then choose APPLY (to the right) (go to step 5). 5. up in the LEFT CORNER of the edit screen, choose SAVE AND REPLACE. that's it - you're done! from here, you can copy the IMG tag and place it in your post, as per the instructions above. any questions, let me know. ron ------------- If you are a visitor and like what you see, please http://foodsoftheworld.activeboards.net/registration_rules.asp?FID=0" rel="nofollow - click here and join the discussions in our community! |
Posted By: AK1
Date Posted: 24 August 2012 at 10:10

|
Posted By: TasunkaWitko
Date Posted: 24 August 2012 at 10:15
|
------------- If you are a visitor and like what you see, please http://foodsoftheworld.activeboards.net/registration_rules.asp?FID=0" rel="nofollow - click here and join the discussions in our community! |
Posted By: ChrisFlanders
Date Posted: 29 September 2012 at 06:03
|
I just got this latest newsletter from Canon about taking "still" pictures. It's well worth to take a look; http://www.canon-europe.com/youconnect_newsletter/tutorials/Still_Life_Photography/dsc/index.aspx" rel="nofollow - http://www.canon-europe.com/youconnect_newsletter/tutorials/Still_Life_Photography/dsc/index.aspx
|
Posted By: gonefishin
Date Posted: 04 November 2012 at 08:06
Welcome ChrisFlanders, the artist formerly known as ChrisBelgium! Dan ------------- Enjoy The Food! |